Wednesday, March 8, 2017

Weekly Wednesday Update #10

Goal Update
Nothing special this week, well until today. I did a simple brick workout (4 miles bike followed by 1 mile run, rinse and repeat 3x) where I set a new mile PR (5:45) and 5K PR (18:14) with my Garmin watch. Not a bad hump day. Looking forward to getting my bike trainer in the next week (shipping from Canada - should be here Monday) to start logging those miles!

Weekly update
Miles Swam: 0 [0]
Miles Run: 19.94 [213.2]
Tacos Ate: 15 [198]
Miles Biked: 62.17 [463.25]

Things I worked on

Late last week I got my Z-Carve put together enough to get an Etsy order out the door. Luckily/surprisingly/maybe I am getting good at this, I did not have to do much calibration from the calculated values for my new belts to get within ~0.5mm repeatability over 300mm!
Custom Wood Sign for Etsy Customer
After cutting out the piece, I spent a lot of time putting together my Z-Carve control box. Instead of me yapping, I’ll show you the proof in the pictures.
Z-Carve Control Board Shell

Z- Carve Control board with Main Electronics

Z-Carve control board in a functional state
I still have to add some of the extra features that caused the re-build of the box, but it is fully functional at this time! The features I will add are the wiring of the push buttons, the status LEDs, and then relay control of the various circuits (spindle, vacuum, enclosure lights). I will be wrapping that up this weekend and then moving my Z-carve bench down approximately 4 inches to give the proper clearance in the Z-direction and enable some expansion.


That Z axis (vertical) clearance though... Damn it Zach.
Favorite Podcast of the Week

I started reading Mr. Money Mustache blog about a year ago. Pete ‘retired’ at around 30 years old and has lived with his wife and kid without holding a real job for the past 12 years, spending only $25-27k per year! His approach has many similarities to minimalism, with the basic goal of simplifying your life and optimizing for what you really want. Really interesting blog and podcast, this podcast will give you a taste of the ‘cult following’ that is Mr. Money Mustache.

Favorite Quote(s) of the Week

“You’re not supposed to optimize for money; you’re supposed to optimize for happiness.” – Mr. Money Mustache (AKA Pete Adeney)

"Just get started today. There is never a perfect time to start so just do it... Win tomorrow today... Compare is despair... Compare yourself to yourself yesterday. "  Portia Jackson eoFire #1582

Random of the Week

Alright, let’s talk about this bike fitting because I have been geeking out about it for almost two weeks. Over in Grand Rapids at properly named Grand Rapids Bicycle Company, they have a Guru Fit System to help fit you to the perfect position. If you are interested, watch this video, it will explain it all. Mechanically, the Guru Fit System is rather simple; a few stepper or servo motors that can move pistons up and down at 1mm increments (probably finer resolution, but as this was my first fitting 1mm was more than enough), allowing extremely easy adjustment of various settings on a bike. The settings we adjusted during the fitting were first the seat height, then the arm reach, then the arm height, then the seat angle, then a few more I don't remember and finally various combination of all these settings. Just like the eye doctor, it was a lot of “is one or two better? Now do you like two or three?” Although I felt like I was giving the wrong answer the whole time (as we all do at the eye doctor), I could actually feel a slight difference with each adjustment. And honestly, I had no idea there was that much adjustment on a bike!

Fortunately, there is some science behind the madness that another person can use to verify the bike position that ‘feels good’ is also bio-mechanically sound. Yes, the nerd is showing, but seriously there is a ton of science behind it - Google 'Biomechanics' and prepare to spend hours realizing how little you know about the way the human body moves. Throughout the fitting, once we found the position I liked, Alex, the professional bike fitter, would have me spin (or pedal) and then come to a rapid controlled stop where he would take a measurement such as my knee angle at the bottom of the pedal cycle. Surprisingly, I was typically right smack dab in the middle of the suggested ranges developed biomechanic experts for all of these measurements. If these measurements weren't enough, the final metric used to dial in the bike fitting was the power output on the bike. It was tracked all through the fitting and you could see a difference as my perfect fit was dialed in. I love it when a plan comes together! Needless to say, after the fitting, I pulled the trigger and bought the bike. While you may think you can just buy a bike and walk out the door to ride, in this case, we spent the next 30-45 minutes adjusting the bike to fit me. Again, nerd alert, but these high value bikes are a work of engineering art! Last summer during my long 60+ mile rides, I would often have some discomfort or numbness throughout the ride. After this fitting, I will be surprised if I couldn’t fall asleep in my new bike position! For those that are just starting out or ready to improve their biking times, I highly recommend getting fit by a professional! Now, it's time to go study. Have a great week everyone!


My new bike and the GURU Fit System


Time to write post: 37 minutes

Wednesday, March 1, 2017

Weekly Wednesday Update #9

Goal Update
This last week of February was a recovery week and I tried to take it a bit easy. Over the weekend, I did not do anything athletic (after getting fit for a Triathlon bike), but drink fantastic Michigan Craft beers and spend time with friends. After coming back from a booze filled weekend, I was shocked at how my Monday workout went; normally it takes several days to ‘sweat out the booze,’ but I crushed a 10.84 mile pyramid run (1 up, 2 x 1.5 miles with 0.5 recovery between, 2 x 1 mile with 0.5 recovery between, 2 x 0.5 miles with 0.5 recovery between, 1 down). Week has been great; just need to jump in that pool...

February Totals
Miles Swam: 0 [-44.4]
Miles Run: 120.97 [+38.77]
Tacos Ate: 91 [+9.2]
Miles Biked: 212.34  [+46.54]
Weekly update - Recovery Week last week
Miles Swam: 0 [0]
Miles Run: 30.41 [210.26]
Tacos Ate: 13 [183]
Miles Biked: 31.66 [401.08]

Things I worked on

Over the past week, I have been putting the Z-Carve back together. Simply put, it sure has been an adventure! I took care of a lot of the sub-assemblies before my weekend extravaganza (replacing belt idlers and pulleys for wider 9mm-GT3 belts and cleaning everything). I also designed and utilized some beneficial access to a 3D printer to rapid prototype some parts (belt clips, drag chain mounts) which I will remake once the Z-Carve is alive. Monday, I finished the installation of the LED lights on my bench so I could see what I was doing and then began the build.
Z-Carve with Enclosure Lights
Check out that clearance! Lucky or good?
Wiring occurred Tuesday and I went to bed shortly after a quick test with the controller. Tonight I wanted/needed to carve a piece for a customer; however, I ran into some trouble during calibration. After tweaking a bunch of settings and the current to the motors, I began to further diagnosis the problem with one of my Y-axis motors which was acting like it was skipping steps. First I removed the belt (and any load on the motor), with the same result. I then did a resistance test on the wiring and found that I had accidently cut a wire when crimping on a connector! After replacing that broken connection, I tested resistance, then fired everything back up and continued with calibration. After adjusting the parameters for the new belt pitch the machine was dialed in within 1mm on 300mm runs! Good enough for tonight as I have to get this blog post done before midnight!
Calibrating using a 1000mm ruler and a v-Bit - Notice the Z- Clearance
My plan for the rest of the week is to get the custom signs out to my Etsy customer, and then spend the remaining time and weekend actually wiring up the CNC control box, adding the waste board and t-slots to my bench and hopefully building the enclosure. One thing I do want to do before building the enclosure is lowering the torsion table ~4 inches. Right now, my Z-axis is limited by ~2 inches due not measuring the Openbuilds Z-axis correctly. Busy week as always!

Favorite Podcast of the Week

New podcast I am listening to: Strength Running Podcast

As I am spending a lot of time running, biking and avoiding swimming, I thought it would be good to expand my knowledge on running. Through numerous resources, I heard the Strength Running podcast is great. I have only listened to 3 episodes (started from the beginning - newish podcast with only 16 episodes to date), but I have already learned so much! Now, I have a more intense warm up and cool down that I use for each run along with some pretty intense core routines. If you want to take that next step with your running ability, I highly recommend listening to the podcast - you never know when you’ll be chased by a bear!

Favorite Quote(s) of the Week

“Get comfortable with being uncomfortable that's how you break the plateau and reach that next level.” - Charlene Johnson

“You are the average of the 5 people you spend the most time with.” ~ Jim Rohn, Tim Ferriss, multiple others

Random of the Week

As I mentioned in last weeks post, this weekend would be an exciting and busy one! Unfortunately, I had some stuff at my full time job that required some extra hours this week, pushing back my workout and then my play time. Shit happens right? Anyways, this random section will be short so I can get some sleep and post this before midnight.

So last Friday - first, I gave a quick presentation at a local community college as a quick interview for developing and then teaching a 3D printing class to a bunch of manufacturing engineers! Over the next few months I will be designing a class (the first in a series of many) and then teaching the 8 hour course on a Friday sometime in June! I kind of like the sound of Professor Zach…

After talking through some of the details about the 3D printing class, I went home, packed and then drove a few hours to get fit for my first Triathlon bike. I went to Grand Rapids Bicycle Shop where the wonderful professional bike fitter, Alex, took about 90 minutes using a sweet Smart Guru fit system to dial in my perfect fit. Luckily for me, what ‘felt’ good also was right in the sweet spot of the bio-mechanically correct position - guess years of practicing good form and mastering mechanical systems has paid off! After the fitting, I purchased my first Triathlon bike, the highly regarded Cervelo P2!!! So excited to begin logging tons of miles on this sexy thing! More details about the fitting to come next week! Go out and do something you dream of - “By doing, it will come.” - Mihoko Ward.

My new Cervelo P2 with the Smart Fit Guru system 
Time to write post: 35 minutes

Wednesday, February 22, 2017

Weekly Wednesday Update #8

Goal Update
Swimming is still lacking, biking has slipped a little, but its because it has been 50+ degrees in Mid-Michigan for the past week!!!! I avoided the dreadmill and got to run outside four times over the past week. Absolutely amazing! On my run over the weekend, I set a new watch record for a 10k (41:15), and increased my VO2 max to 58 ml/kg/min. To translate, the Garmin race predictor (which is relatively accurate according to numerous runners) indicates my 5k should be 17:43 and more importantly, my marathon time should be 2:49:43! If nothing else, I will use these as realistic goals and then cruise past them!

Miles Swam: 0 [0]
Miles Run: 32.04 [179.85]
Tacos Ate: 20 [170]
Miles Biked: 16.84 [369.42]

Things I worked on

While I may be avoiding the deep end of the pool, this weekend I took a plunge. First, my OCD overtook my best judgement and I designed and carved a new electronics control box for my CNC machine. In my defense, my first design had a majorly annoying design flaw which made assembling the panel connectors and wiring them a pain in the rear! This new design has removable acrylic panels, which not only look sexy, but make wiring a breeze! I just finished spray painting the final coat on the box, and will start assembly over the next few nights.
Front and back panels

Primed electronics box

Carving side panels

While the electronics re-do was unintended, the bigger plunge that took place was the
destruction dismantling of my X-Carve to build the Z-Carve. I took a time lapse of it (looks pretty cool) and plan to take another time lapse of the building and then do some light video editing before posting on YouTube. Stay tuned; it should be a doozy - I mean really, there is ~⅛” clearance between my table’s supports and the motors!
Before dismantling my X-Carve I did finish a simple item I had put off for way too long - a simple knife holder. Previously, I was acting like the standard bachelor and kept all my knifes scattered in a drawer (okay, they were in a silverware organizer). Now, I have this - based on a design by ZenziWerken. I will be putting these up on Etsy shop as well as writing up the project for the Inventables Project page. If you get the Inventables newsletter, this knife block was featured in this week’s random Instagram photos at the end!
Simple Knife Block

Favorite Podcast of the Week


Great podcast to help me get my act together and start that side hustle. Best way to describe it is from the link above:

“There is a huge gap between working full time and running a successful job-free income business. I’m here to bridge that gap.

Here’s the deal:
I believe busy full time workers who want to build a successful side income business MUST become experts in a lot of areas fast.

You must listen to the right people online, the experts who will show you step by step formulas for growing a side business.

Instead of reading hundreds of books, listening to the podcast carousel of “experts” that are trying to sell you on a product, and trying strategies from gurus who are doing entrepreneurship full time unlike you…

Favorite Quote(s) of the Week

“Try not to become a person of success, but rather a person of value.” - Einstein

"Action always beats inaction." - Robert Kiyosaki

"Nothing will happen unless you take action and create it, and creating it is a process, not a single event." - Kate from EOFire

Random of the Week

Well, I got my first Etsy sale shipped over the weekend and the customer loved it! She has seriously been the greatest customer, not only being very understanding and easy to work with, but has also given me tips on improving my shop and listings. While I am still in the process of updating and improving my shop (a continuous thing), I will share the link to the Milbot Industries etsy shop now. In the near future, I will be putting up several additional items and trying to produce some more attention and sales through social media. If you could help me out and share my shop with family and friends, I will figure out how to set up discounts for you and anyone you send my way. Have them message me through etsy and mention this blog post to get the discount!

First Etsy Sale - Custom Wood Sign 8 x 10 in
While this section may not be as interesting this week as it has in previous weeks, trust me, there is a lot coming over this weekend. Friday, I will be off work, but have obligations from 8:30am to 9pm! Saturday I will be at a beer festival with my best friend to taste some of the world’s best craft beers, and then Sunday I will be babying the hangover (good thing this is a recovery week) and hopefully building the Z-Carve. I promise there is some very exciting stuff coming soon, which I will let you know about next week!

Time to write post: 31 minutes

Wednesday, February 15, 2017

Weekly Wednesday Update #7

Goal Update

Okay. This pool thing isn’t funny anymore. Now I am 33 miles behind schedule; I have received the Total Immersion Book and DVD (haven't consumed them yet) and my excuse now is that I cut my finger pretty good while working on some projects late on Tuesday… What an idiot - I even had gloves on, just wasn't focusing on the task at hand. Anyways, once this heals to the point it is safe to do so, I will cannon ball into the local overly chlorinated (probably a good thing) pool and start swimming back and forth in the pool the 2324 times I need to [in case you are wondering that is 33 miles in a 25 yard pool - of course I did the math].

Miles Swam: 0 [0]
Miles Run: 21.24 [147.81]
Tacos Ate: 21 [150]
Miles Biked: 69.96 [352.58]
Garmin Connect Graph

Things I worked on

This past week I did a much better job of FOCUSing. Instead of having the usual Friday off to attack my home projects, I went into work as they pay the bills; however, I still made a lot of progress on my electronics control box. Let me tell you, there is a shit-ton (technical term) of wiring I have had to do. Good news is the end is in site and I plan to get this all squared away over the weekend! Unfortunately, I do not have a picture of the progress at this time and honestly it looks like a mess.

I also have installed a top to my Z-Carve workbench enclosure and began wiring the LED strips. The long Y-axis rails have been assembled with the aluminum supports I made last week, so the surgery should occur relatively smoothly this weekend.

Z- Carve Enclosure Before Top was installed
One minor hiccup that set me back last weekend was a blessing in disguise. A fantastic customer (and shop owner) on Etsy requested a custom sign for her nephew, requiring me to cobble engineer a functioning Z-Axis mechanism to produce this sign. I am so excited to send this to her over the weekend. She has been giving me tips and helping me really get my Etsy shop up to the standards it should be at. Next week I will share a link to my updated shop; please share with your friends and family!
Custom Sign to show backgrounds, infills and some text options

Favorite Podcast of the Week


Wow. That’s about all I need to say about this one. Peter Is the founder of XPRIZE foundation and is a radical future thinker. Trust me, listen to this one closely.

Favorite Quote(s) of the Week

"Nothing will happen unless you take action and create it, and creating it is a process, not a single event."EoFire

Random of the Week

My mind has been rather scrambled even with my efforts to FOCUS. As soon as I was ready to tear apart my X-Carve and move it, I got a custom order on Etsy, something I have been patiently waiting for for several months. Now that I got that order, I feel the urge to fix up my Etsy shop and make it into something that I would honestly spend money at. While I have done research on copy-writing, advertising, networking, simple photography and other skills to have a successful Etsy business, I never took the time to put that research into practice. This first customer (who has been seriously wonderful - providing tips, feedback and the like) gave me that push to really kick off this side business I have talked about for years. Step one has happened. Now its time to that next level. Not at a later time that will inevitably be pushed down the road to a never occurring date, but now in February of 2017.

With some simple math, I can easily manage a side business with net income of over $1000 a month between the hours of 7pm and 10pm during the week. Seriously, it's not hard. Check out StepCraft’s free E-book - “Start Your Own Business – With a Stepcraft All-In-One Creation System” if you don’t believe me (note: I do not get anything from this and have no affiliation with StepCraft. I randomly happened upon their site through one of many sources and saw this book with the right price so I gave it a shot). I have only read 10 pages of it thus far (while biking today), but it really outlines the process and it is that simple. I plan to document my journey to prove to myself and you just how easy it is, and give everyone a place to learn from my mistakes. To finish off this rant, here is another quote that really hit me this past week:

"Not even average effort is going to get you to true success." - Timothy Sykes

Time to write post: 31 minutes

Wednesday, February 8, 2017

Weekly Wednesday Update #6

Goal Update

Well, I’m back at it feeling stronger than last month (as an engineer, I need some data behind such broad statements, so by my Garmin watch, I set a new PR in the 5k (18:46) and 10k (43:12) during dreadmill training runs this past week). But seriously, I need to get in the pool. 28 miles behind schedule at this point 

Miles Swam: 0 [0]
Miles Run: 29.93 [126.57]
Tacos Ate: 24 [129]
Miles Biked: 70.39 [282.62]
Garmin Connect Graph - Can't get G-docs to make it look this pretty...

Things I worked on

After last weeks realization, I have been trying to FOCUS (follow one course until success - Robert Kiyosaki). Well, to be honest, it's not going that well, but hey with practice comes perfection.

I did make the 8 aluminum supports for my y-axis manually! Cut out a MDF template with my CNC machine, marked the hole locations with a center punch, pilot drilled holes with a 3/32” bit, then used a 7/32” bit to enlargen the holes and give some wiggle room while installing them.
Not my ideal way, but it worked

I have finished half of a surprise gift for a close friend, with plan/goal/statement of finishing it up this Friday.

I have also painted the electronics enclosure and began the soldering and wiring process - wow, this is going to take a while.
Spray painting outside in 25F temps (take inside to bathroom with fan to dry)
One slight problem I have encountered is the fact I did not account for the paint in my tolerancing of the holes… Last night I tried to thread in one of my aviation plugs which will connect to my CNC’s stepper motors and I can’t quite get the nut onto the threads… I have a plan to fix this slight problem, which in my brain has already turned into controller box v2. Before I begin down that rabbit hole, I am going to complete v1 and install it so that v2 will fix all v1 mistakes - FOCUS in action right? Let’s count it ;)

This weekend (while my new Z-axis belt is on it’s way) I will finish up the electronics, the workbench, and upgrade to the Z-Carve. End. Of. Story.

Favorite Podcast of the Week

Great podcast where Jonathan gives some insights on how to handle your life with the good life bucket model. From the podcast notes:

“The idea’s really simple,” says Jonathan. “Think of your life as three buckets. One is called your vitality bucket. That’s about optimizing your state of mind and body. The second is called your connection bucket. That’s about cultivating deep and meaningful relationships. The third is your contribution bucket. That’s about how you bring your strength, your gifts, and your beliefs to the world. It’s about how you contribute to the world around you. And that may be the way you also earn your living, but interestingly it may also not be the primary source of income for you.”

“The good life, then, is when you basically do the work to make all three buckets as full as you can get them and then develop a daily practice of…everyday taking a quick look and saying, ‘Okay, so how full is each one of these three buckets, and what can I do today to fill them?’

Favorite Quote(s) of the Week

The factory of the future will have only two employees, a man and a dog. The man will be there to feed the dog. The dog will be there to keep the man from touching the equipment.” – Warren G. Bennis

Random of the Week

Well its been 6 weeks, time to stop this silly blog. You’re welcome!


Okay, you caught me, I really enjoy doing this to not only help me be accountable for my goals and projects, but I heard from some loving family members (thank you Dad and Grandma!) they really get a hoot out of my rambling. As I mentioned in week 2, I would wait 6 weeks until I made an investment in a better blog/website hosting option due to my OCD and perfectionism (honestly, I spend as much time formatting the posts as I do writing them). I will be going transferring my site to HostGator at some point, but with my current project, exercise, work, sleep, taco and studying load, I am going to postpone this move until I pass that PE exam!

In the mean time to calm my OCD nerves and countless minutes of editing HTML code, I stumbled (okay google ninja searched) across WYSIWYG editors (what you see is what you get). These things allow me to type up my post in google documents, copy them into an editor, format until my eyes go cross, then copy the HTML into blogger and away we go. If you google search “WYSIWYG html editor online” you will come across numerous options (272,000 to be exact); personally I just click on one and try it out. Haven’t found a preferred editor yet, but they all have worked great! Problem solved [for now]!

Thank you for reading. Please leave questions or comments below!


Time to write post: 33 mins

Saturday, February 4, 2017

My CNC Control Box: Use Raspi GPIO Pins to Control CNC

After a year or so of running my X-carve with a laptop on a slide out drawer below my machine, I wondered if it was possible to add simple control buttons to the raspberry pi to control the X-Carve (i.e. feed hold, pause, resume, etc.). After some digging through the forums, blogs and numerous other sources, I couldn’t find anything. One day, while looking through the Chilipeppr interface, I found Frank Graffagnino's Shuttle express controller. Frank connected a Shuttle Xpress USB device to his Raspberry pi controlled Shapeoko to jog his spindle around. After digging into his code, it looked like he had created exactly what I was looking for; raspberry pi buttons to add commands to the Serial port JSON server.

Well, here goes nothing!
Note: I did make a backup of my current raspbian image (using Win32DiskImager) before messing around so I would have a fail safe to go back to.

Build Instructions

(Written for Raspbian, but should work for others)
Ensure openssl dev libraries are installed: (~1 min on Raspi2)
sudo apt-get install libssl-dev build-essential

Install nopoll library (~ 1.5 mins)

Download the nopoll library from here: http://www.aspl.es/nopoll/downloads/ (I'm currently using version 0.2.9.b207).
cd ~
wget http://www.aspl.es/nopoll/downloads/nopoll-0.2.9.b207.tar.gz

Extract and change into the extracted directory
tar -xzvf nopoll-0.2.9.b207.tar.gz
cd nopoll-0.2.9.b207

Configure, make, and install the nopoll library with the usual:
./configure
make
​sudo make install

Install cURL (~10 mins)

Download the cURL library from here: https://curl.haxx.se/download.html
cd ~
wget https://curl.haxx.se/download/curl-7.52.1.tar.gz

Extract, configure, make, and install the cURL library with the usual:
tar -xzvf curl-7.52.1.tar.gz
cd curl-7.52.1
./configure
make
sudo make install

Install WiringPi (~0.5 min)

This step is only necessary if you want to have LEDs or switches hooked up to a raspberry pi.
If you aren't using led's and switches, just edit the Makefile and change the GPIO_SUPPORT to 0 to disable it. You can also remove -lwiringPi from the libs line.

Take a git clone of the wiringPi utility and use their included build script to build and install the library. Instructions are here: http://wiringpi.com/download-and-install/
Change directory back to your home directory or wherever you were working from
cd ~

A quick version of the wiringPi instructions
git clone git://git.drogon.net/wiringPi
cd wiringPi
./build

Install ShuttleCP (~2 mins)

Download ShuttleCP from Github at https://github.com/lordmundi/shuttleCP.

Change directory back to your home directory or wherever you were working from
cd ~
git clone https://github.com/lordmundi/shuttleCP

Change into the shuttleCP directory
cd shuttleCP 

Edit shuttlecp.c and update the following items at the top of the file if you need to. You can likely just leave them alone:
sudo nano shuttlecp.c

#define CNC_HOST "localhost"           // Hostname where SPJS or bCNC is running
#define CNC_PORT "8989"                // Port for SPJS or bCNC. ;Typically 8989 for Chillipeppr and 8080 for bCNC
#define DEVICE_PATH "/dev/ttyUSB0"     // Path for SPJS to connect to GRBL or TinyG. ;Not used for bCNC
#define TINYG "1"                      // set to 1 if you are using a TinyG
#define BCNC "0"                       // set to 1 if you are using bCNC instead of Chilipeppr
#define CYCLE_TIME_MICROSECONDS 100000 // time of each main loop iteration
#define MAX_FEED_RATE 1500.0           // (unit per minute - initially tested with millimeters)
#define OVERSHOOT 1.06                 // amount of overshoot for shuttle wheel

CNC_HOST circled in red, DEVICE_PATH circled in blue

Crtl-x to save, then 'y' to confirm

Build the shuttleCP binary by running make in the shuttleCP directory.
make

I also do the following to install shuttlecp so that it can be run regardless of which folder you are in when you execute the program.
sudo make install

Running

​1. For ChiliPeppr, first, make sure SPJS is already running and ChiliPeppr has already opened a connection to your machine. I run SPJS on the same raspberryPi that I run the ShuttleCP utility on.
For bCNC, make sure that bCNC is running and is connected to the GRBL board.
2. All alarms must be clared and the CNC machine state is reported as "Idle".
3. Start up shuttlecp with an argument that is the device interface for your ShuttleXpress. Mine is /dev/input/by-id/usb-Contour_Design_ShuttleXpress-event-if00
Use sudo so that wiringPi has access to GPIO pins:​
sudo ./shuttlecp /dev/input/by-id/usb-Contour_Design_ShuttleXpress-event-if00
​Or, you can use the "./shuttle" script, which effectively does the same thing.

As I do not currently have the shuttle device, I got the following output when running “./shuttle”:
pi@JSON-CNC-test ~/shuttleCP $ ./shuttle
Starting shuttleCP ...
Attempting connection to JSON-CNC-test:8989
Websocket connected.
/dev/input/by-id/usb-Contour_Design_ShuttleXpress-event-if00: No such file or directory

Again, I went back to the Github source and looked for why this was happening. In the main loop of the shuttlecp.c file, I found the code loops until the device is connected. Therefore, by changing line 386 in shuttlecp.c from
shuttle_device_connected = 0;
to
shuttle_device_connected = 1;

I was able to bypass this loop and still utilize the code for the Raspi switches and LEDs.

Now to test the switches and LEDs…
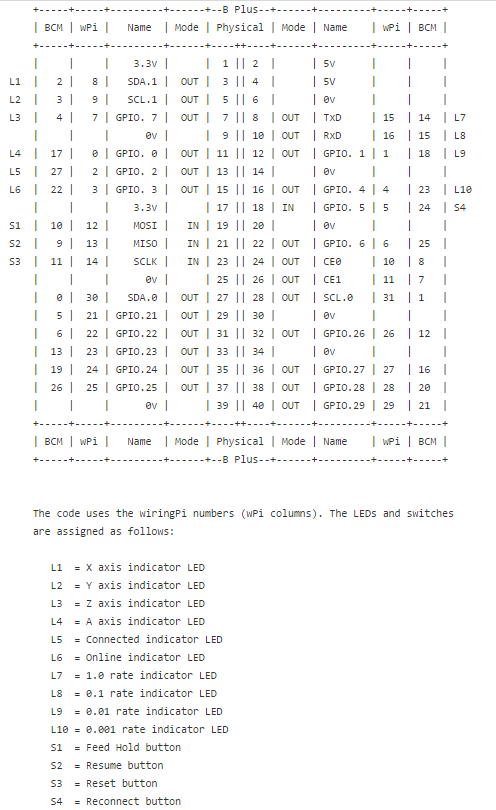
Below is a image showing the wiring for the RASPi and WiringPi
From https://github.com/lordmundi/shuttleCP/blob/master/README_pinout.txt   

Using the above chart as a reference, I wired up up some LEDs and buttons and then commented out (my commented shuttleCP verision is located here - note the instructions at the top) a lot more code. Then you must re-make and install shuttleCP

make
sudo make install

 and tried to run it using this command....

sudo ./shuttlecp /dev/input/by-id/usb-Contour_Design_ShuttleXpress-event-if00


which gave this result...
pi@JSON-CNC-test ~/shuttleCP $ sudo ./shuttlecp /dev/input/by-id/usb-Contour_Design_ShuttleXpress-event-if00
Attempting connection to JSON-CNC-test:8989
Websocket connected.
Shuttle device connected.
RESUME detected
Sending websocket cmd: send /dev/ttyUSB0 ~

​​​    + Successfully sent cmd: send /dev/ttyUSB0 ~

Sent 1 commands


Success!!!Now go hook up your Raspberry Pi with some LEDs and buttons so you can control your TinyG from your workbench without a computer!!!!

Set up the Script to Auto Start

If you have read my previous post on making the GPIO server auto start, this follows the same process.

The first step; however, was to remove the need to pass an argument to the shuttlecp program. This was done by commenting out the following lines in the int main function (approximately line 376) from the shuttlecp.c file:

// if (argc != 2) {
  // fprintf(stderr, "usage: shuttlecp <device>\n" );
  // exit(1);
//}

//dev_name = argv[1];

All this is doing is removing the need to pass the device name in with the execution command. WE will then replacing the last line with the following to 'hard code' a fake device name (its not used at this time anyways). Note: this will change if you actually want to control the CNC machine with some sort of controller...

dev_name = /dev/input/event0;

Then edit the start-up script by entering the following command (visit this github for more info and search for 'start-up')

sudo nano /etc/init.d/serial-port-json-server

and add the following line to the case "$1" arguments:

/home/pi/shuttleCP/shuttle

Here is my case "$1" for reference:

case "$1" in
  start)
    log_begin_msg "Starting Serial Port JSON Server service"
# do something
     /home/pi/serial-port-json-server-1.92_linux_arm/serial-port-json-server -regex usb &
     /home/pi/gpio-json-server &
     /home/pi/shuttleCP/shuttle

  log_end_msg $?
  exit 0

To exit, press 'crtl' + 'v', then 'y' to save. Then make the script executable with

sudo chmod +x /etc/init.d/serial-port-json-server

and finally, update it.

sudo update-rc.d serial-port-json-server defaults

Now reboot with

sudo reboot

If all goes well, when you open chilipeppr and hit a button, you should see commands show up in the serial port console on.

~ is the resume command and ! is the feedhold command

Now we just need a way to control x, y, and z motion...