After a year or so of running my X-carve with a laptop on a slide out drawer below my machine, I wondered if it was possible to add simple control buttons to the raspberry pi to control the X-Carve (i.e. feed hold, pause, resume, etc.). After some digging through the forums, blogs and numerous other sources, I couldn’t find anything. One day, while looking through the Chilipeppr interface, I found Frank Graffagnino's Shuttle express controller. Frank connected a Shuttle Xpress USB device to his Raspberry pi controlled Shapeoko to jog his spindle around. After digging into his code, it looked like he had created exactly what I was looking for; raspberry pi buttons to add commands to the Serial port JSON server.
Well, here goes nothing!
Note: I did make a backup of my current raspbian image (using Win32DiskImager) before messing around so I would have a fail safe to go back to.
Build Instructions
(Written for Raspbian, but should work for others)
Ensure openssl dev libraries are installed: (~1 min on Raspi2)
sudo apt-get install libssl-dev build-essentialInstall nopoll library (~ 1.5 mins)
Download the nopoll library from here: http://www.aspl.es/nopoll/downloads/ (I'm currently using version 0.2.9.b207).
cd ~wget http://www.aspl.es/nopoll/downloads/nopoll-0.2.9.b207.tar.gz
Extract and change into the extracted directory
tar -xzvf nopoll-0.2.9.b207.tar.gz

cd nopoll-0.2.9.b207
Configure, make, and install the nopoll library with the usual:
./configure
make
sudo make installInstall cURL (~10 mins)
Download the cURL library from here: https://curl.haxx.se/download.html
cd ~wget https://curl.haxx.se/download/curl-7.52.1.tar.gz
Extract, configure, make, and install the cURL library with the usual:
tar -xzvf curl-7.52.1.tar.gz

cd curl-7.52.1

./configure

make

sudo make install
Install WiringPi (~0.5 min)
This step is only necessary if you want to have LEDs or switches hooked up to a raspberry pi.
If you aren't using led's and switches, just edit the Makefile and change the GPIO_SUPPORT to 0 to disable it. You can also remove -lwiringPi from the libs line.
Take a git clone of the wiringPi utility and use their included build script to build and install the library. Instructions are here: http://wiringpi.com/download-and-install/
Change directory back to your home directory or wherever you were working from
cd ~
A quick version of the wiringPi instructions
git clone git://git.drogon.net/wiringPi

cd wiringPi

./build
Install ShuttleCP (~2 mins)
Download ShuttleCP from Github at https://github.com/lordmundi/shuttleCP.
Change directory back to your home directory or wherever you were working from
cd ~

git clone https://github.com/lordmundi/shuttleCP
Change into the shuttleCP directory
cd shuttleCP
Edit shuttlecp.c and update the following items at the top of the file if you need to. You can likely just leave them alone:
sudo nano shuttlecp.c
#define CNC_HOST "localhost"           // Hostname where SPJS or bCNC is running

#define CNC_PORT "8989"                // Port for SPJS or bCNC. ;Typically 8989 for Chillipeppr and 8080 for bCNC

#define DEVICE_PATH "/dev/ttyUSB0"     // Path for SPJS to connect to GRBL or TinyG. ;Not used for bCNC

#define TINYG "1"                      // set to 1 if you are using a TinyG

#define BCNC "0"                       // set to 1 if you are using bCNC instead of Chilipeppr

#define CYCLE_TIME_MICROSECONDS 100000 // time of each main loop iteration

#define MAX_FEED_RATE 1500.0           // (unit per minute - initially tested with millimeters)

#define OVERSHOOT 1.06 // amount of overshoot for shuttle wheel |
| CNC_HOST circled in red, DEVICE_PATH circled in blue |
Crtl-x to save, then 'y' to confirm
Build the shuttleCP binary by running make in the shuttleCP directory.
make
I also do the following to install shuttlecp so that it can be run regardless of which folder you are in when you execute the program.
sudo make installRunning
1. For ChiliPeppr, first, make sure SPJS is already running and ChiliPeppr has already opened a connection to your machine. I run SPJS on the same raspberryPi that I run the ShuttleCP utility on.
For bCNC, make sure that bCNC is running and is connected to the GRBL board.
2. All alarms must be clared and the CNC machine state is reported as "Idle".
3. Start up shuttlecp with an argument that is the device interface for your ShuttleXpress. Mine is /dev/input/by-id/usb-Contour_Design_ShuttleXpress-event-if00
Use sudo so that wiringPi has access to GPIO pins:
sudo ./shuttlecp /dev/input/by-id/usb-Contour_Design_ShuttleXpress-event-if00
Or, you can use the "./shuttle" script, which effectively does the same thing.
As I do not currently have the shuttle device, I got the following output when running “./shuttle”:
pi@JSON-CNC-test ~/shuttleCP $ ./shuttle

Starting shuttleCP ...

Attempting connection to JSON-CNC-test:8989

Websocket connected.

/dev/input/by-id/usb-Contour_Design_ShuttleXpress-event-if00: No such file or directory

/dev/input/by-id/usb-Contour_Design_ShuttleXpress-event-if00: No such file or directory

/dev/input/by-id/usb-Contour_Design_ShuttleXpress-event-if00: No such file or directory
Again, I went back to the Github source and looked for why this was happening. In the main loop of the shuttlecp.c file, I found the code loops until the device is connected. Therefore, by changing line 386 in shuttlecp.c from
shuttle_device_connected = 0;
to
shuttle_device_connected = 1;I was able to bypass this loop and still utilize the code for the Raspi switches and LEDs.
Now to test the switches and LEDs…
Below is a image showing the wiring for the RASPi and WiringPi
|
||
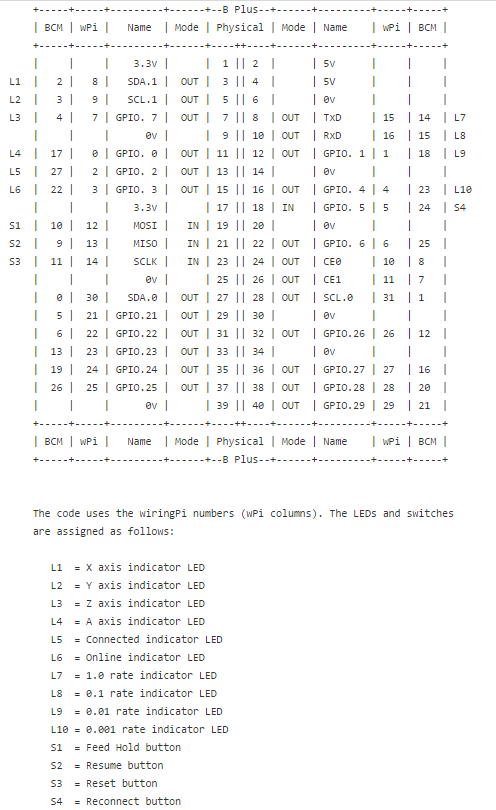
Using the above chart as a reference, I wired up up some LEDs and buttons and then commented out (my commented shuttleCP verision is located here - note the instructions at the top) a lot more code. Then you must re-make and install shuttleCP
and tried to run it using this command....
which gave this result...
make

sudo make install
and tried to run it using this command....
sudo ./shuttlecp /dev/input/by-id/usb-Contour_Design_ShuttleXpress-event-if00which gave this result...
pi@JSON-CNC-test ~/shuttleCP $ sudo ./shuttlecp /dev/input/by-id/usb-Contour_Design_ShuttleXpress-event-if00
Attempting connection to JSON-CNC-test:8989
Websocket connected.
Shuttle device connected.
RESUME detected
Sending websocket cmd: send /dev/ttyUSB0 ~
+ Successfully sent cmd: send /dev/ttyUSB0 ~
Sent 1 commandsSuccess!!!Now go hook up your Raspberry Pi with some LEDs and buttons so you can control your TinyG from your workbench without a computer!!!!
Set up the Script to Auto Start
If you have read my previous post on making the GPIO server auto start, this follows the same process.
The first step; however, was to remove the need to pass an argument to the shuttlecp program. This was done by commenting out the following lines in the int main function (approximately line 376) from the shuttlecp.c file:
All this is doing is removing the need to pass the device name in with the execution command. WE will then replacing the last line with the following to 'hard code' a fake device name (its not used at this time anyways). Note: this will change if you actually want to control the CNC machine with some sort of controller...
Then edit the start-up script by entering the following command (visit this github for more info and search for 'start-up')
and add the following line to the case "$1" arguments:
The first step; however, was to remove the need to pass an argument to the shuttlecp program. This was done by commenting out the following lines in the int main function (approximately line 376) from the shuttlecp.c file:
// if (argc != 2) {
  // fprintf(stderr, "usage: shuttlecp <device>\n" );

  // exit(1);

//}


//dev_name = argv[1];
All this is doing is removing the need to pass the device name in with the execution command. WE will then replacing the last line with the following to 'hard code' a fake device name (its not used at this time anyways). Note: this will change if you actually want to control the CNC machine with some sort of controller...
dev_name = /dev/input/event0;
Then edit the start-up script by entering the following command (visit this github for more info and search for 'start-up')
sudo nano /etc/init.d/serial-port-json-server
and add the following line to the case "$1" arguments:
/home/pi/shuttleCP/shuttle
Here is my case "$1" for reference:
case "$1" in
  start)
    log_begin_msg "Starting Serial Port JSON Server service"

# do something
     /home/pi/serial-port-json-server-1.92_linux_arm/serial-port-json-server -regex usb &
     /home/pi/gpio-json-server &
     /home/pi/shuttleCP/shuttle


  log_end_msg $?
  exit 0
To exit, press 'crtl' + 'v', then 'y' to save. Then make the script executable with
sudo chmod +x /etc/init.d/serial-port-json-server
and finally, update it.
sudo update-rc.d serial-port-json-server defaults
Now reboot with
sudo reboot
If all goes well, when you open chilipeppr and hit a button, you should see commands show up in the serial port console on.
 |
| ~ is the resume command and ! is the feedhold command |
Now we just need a way to control x, y, and z motion...
Great post!
ReplyDeleteCan you make the script autoexecute on boot or do you have to wait for bCNC to be running?
Regards,
Mike
Great question Michel. At this point, I do not run bCNC; I run JSON server on my Raspi with Chilipeppr as my interface to my CNC machine. Lord Mundi (writer of the program) mentions in his read me file (https://github.com/lordmundi/shuttleCP/blob/master/README):
Delete"For bCNC, make sure that bCNC is running and is connected to the GRBL board.
All alarms must be cleared and the CNC machine state is reported as "Idle"."
Once I finish up my new electronics control box, I will be attempting to have the script auto-execute on boot and will be sure to share my results. It wouldn't be too difficult to try out yourself; see my posts on GPIO and JSON server on how to do it. Let me know if you have any questions!