Monday, April 25, 2016

Bottle Cap Table


Throughout college, I always wanted to create a bottle cap table. Well, two years out of school, I finally got started... and finished...? 


The plan is to put this bottle cap table top on top of a whiskey barrel coffee table... More on that later!


Step 1: Test Color Scheme


I bought a slab of oak wood from the local hardware store, cut it, and stained with two varieties. As I am bad with colors, I requested the assistance of my family and friends to vote on there favorite color.

Stain 1: Ebony

Stain 2: Red

Step 2: Purchase Plywood, Add Border, Stain and Protect

Well, the red made the bottle caps pop out much more than the dark ebony stain. Therefore, I went back to the hardware store and purchase a nice 48in x 24in sheet of 1/2" oak plywood. With the help of my neighbor, I added a nice 1" square oak boarder to the plywood, held in place with glue and some counter bore screws (border is ~1/2" above plywood surface to hold the epoxy). The counter bore holes were plugged with some nice walnut plugs. After a quick sanding with some 120 and 220 grit sandpaper, I stained the assembly, waited for the stain to dry, lightly sanded and stained again. 


After drying overnight, I proceeded to protect the table top with 3 coats of polyurethane, which helps seal the wood and limit the number of bubbles that happen when the epoxy coating is added.


Step 3: Prepare

Start saving up your bottle caps! I have a few boxes from the help of family and friends!

I was planning on doing something like this; however, the size of my table would make it look just like a mess.


I ended up using power point to create my design; a block I for the University of Illinois, my Alma Mater.


Step 4: Hot Glue and Bottle Caps

I tested out several glues (gorilla glue, super glue) and found that hot glue was the best glue I had around. After bending the caps to be approximately round, I glues the outer rim and then set them down onto the table, holding pressure for ~10 seconds per cap. Warning: This is a tedious process! The following pictures were taken over a month apart... I put down ~20-50 caps per night a few nights a week.
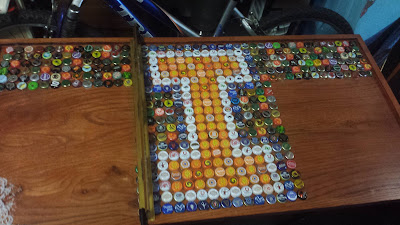
Short rows
Some Notes: It is difficult to place the caps in perfectly straight lines. After 5 rows that were beginning to drift, I put down the middle row and then worked outwards. The end result was much better! (I have a slight case of OCD)...


Over half way there
Complete!!!

Step 4: Clean up Time

While the hot glue worked well, it was rather messy. I spent nearly an hour, pulling off extra glue strings and scraping any glue that ran outside of the caps. After about 10 minutes, I began using a shop vacuum to help suck up any bit of glue and string, eventually removing some of the caps! Once this happened, I got the hot glue gun out and began checking each cap to make sure it was secure to the table. Once the resin is poured, any un-secure cap would most likely float, causing the table to have a high spot... Not good for my OCD!


Step 5: The moment of truth... The Resin Pour

Once sure the table was cleaned, I purchased some Environmental Technology 32-Ounce Kit Casting' Craft Casting Epoxy, Clear

Before pouring it on the table, I mixed up a very small batch and made a few coasters with the same stain, polyurethane and glue to make sure there was no odd chemical reaction with the various components. Everything worked well, So I mixed up a full batch of the 32 ounce kit, and then carefully poured and worked the resin around the caps. 


After pouring the resin, I used a hand held butane torch to pop any bubbles that appeared. Luckily, the polyurethane coating sealed the wood from out gassing, and this was not a difficult task. 
Small bubbles forming before torching
Die Bubbles, Die!


So far so good, but I had to buy another 32 ounce kit...


and another 32 ounce kit...


In total, I used 4 kits to make a nice even glassy surface level with the wood borders. Between each pour, I let the resin cure for at least 24 hours. There is NO evidence of layer lines between the pours, and looks like glass! 


This resin, while expensive, is well worth the price. It created a glass finish that should withstand the test of time. Now the next step is to find a whiskey barrel, break it apart, and make a home for this awesome table top!

Thursday, April 7, 2016

CNC Programming Workflow - Inkscape --> Easel --> Chilipeppr

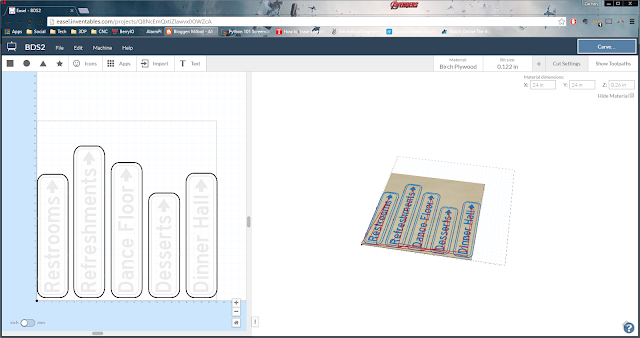
Here is an example of one of my CNC programming workflows. This path is used when the design functionality of Easel does not met my needs, but a CAD program is not required. The simple workflow is as follows:

  1. Design desired thing in Inkscape
  2. Export svg from Inkscape
  3. Import svg into Easel
  4. Position/resize svg and edit cut settings
  5. Create g-code in Easel
  6. Export g-code from Easel
  7. Import g-code into Chilipeppr
  8. Set up material and Carve
  9. Enjoy!

Items used in this build: (purchasing through these affiliate links helps me to hack on)


Use Case: Direction Signs for a Wedding

My sister asked me to make some signs and things for here upcoming wedding. Since the reception will be in Wisconsin at a barn-yard like venue, she thought it would be cool to have a direction sign to point towards various activities; therefore, I needed to make something happen.

After some research, I found that the USA among other countries use a font called "highway gothic" for there road signs. 


Step 0: Download and install "Highway Gothic" font

I downloaded the font from here. To install, unzip the file, and copy/paste/move the ttff (TrueType Font File) in your 'fonts folder' (usually C:/Windows/Fonts).


Step 1-2: Create and Export svgs in Inkscape

There are numerous tutorials on how to use inkscape, visit the google machine to learn how. Some tips I used are as follows: 
  • To make rounded corner rectangles, select the rectangle tool, then select the rectangle you want to round. In the top right corner, click and drag the white dot to smooth out the corners.
  • Make sure you make all objects as paths or it will not import into easel!


Step 3-4: Import SVGs into Easel and Modify

Since this was a relatively simple carve, I used Easel to create the g-code. To do this, import the SVG you just made, then re-size and position it as necessary. 


Cut settings:

  • Bit: 1/8" (actual diameter: 0.122") down cut spiral bit
  • Feed Rate: 40 in/min
  • Cut Depth: 0.06 in/pass
  • Safety height: 0.150 in
  • Step over: 40%

Step 5-6: Create and Export Gcode from Easel

After everything is set up in easel how you want it, view the tool paths by clicking the 'Show Tool paths' button in the top right. If it still looks good, export the g-code by selecting 'Machine' --> 'Advanced' --> 'Generate G-code' [wait for a few seconds] --> 'Export G-code'.

Step 7-8: Import G-code into Chilipper, set up material, and carve.

Copy and paste the g-code into chilipeppr. Once the g-code is loaded, ensure the carve looks like it should be.


If the carve looks correct, add your material to your machine, set up your machine and begin the carve!

Note: 1/4" plywood tends to bow a little bit; therefore, I added first carved out a drilling pattern for attaching the 1/4" to my waste board.


Step 9: Enjoy!!!


Stay tuned for a picture of the final product at the wedding in June 2016!


Learnings:

  • Use a down-cut spiral bit. This will reduce the number of 'fuzzies' you have to clean up later drastically! I used a diamond cut bit, which left a smooth bottom, but a fuzzies top.
    • More information on bits and there uses can be found here.
  • I left the letters as cut to show the nice wood. Make sure to only cut 0.02" into the wood so you do not show the second layer of the plywood.
  • If you want to paint the letters you carve out, seal the plywood before carving and cover the entire sign area with contact paper. 
    • After carving, paint the edges of the carve with the top color of the sign (in this case it would be green). Then paint the letters whatever color you want (I would do white in this case). 
    • Remove the contact paper once the paint has dried and seal the entire sign.


Build Progression:


Click here to view a time lapse of the carve (because time lapse are just awesome!)


Obtain 1/4" plywood, sand with 150 grit and 20 grit to smooth surface
Paint the plywood
Loosely attach plywood to waste board
Run drill pattern and screw down plywood securely
Begin the Carve
Admire the masterpiece being created
Is it just me that finds watching a CNC relaxing?
Admire, remove, sand and repeat
Sand (see fuzzys - look at learnings to reduce) 

Almost done...

Resources:

My 'Initial' X-Carve Setup

After a few months of having the X-carve up and running, I have got some time to talk about my current setup and some recent upgrades.

Several years ago during my college years, I started out with the ambition of building a CNC machine from scratch; using MDF as the build materials, Makerslides as the liner rails, 1/4-20 threaded rods as the lead screws, NEMA17 stepper motors to drive the machine, and a Netduino running a custom CNC controller to control it. Once I got 2 of the three axis built, I realized how imprecise the machine was, and how little time I had to code, debug, and update a custom CNC controller. While this was a fun adventure, I wanted to get to making things and needed to speed up the process.


I had been following the shapeoko 1 and 2 and was in the process of purchasing the necessary parts when I heard rumors of a new machine being released by Inventables. The announcement of the X-Carve was exactly something I was looking for, and waited many months to get my parts, I started to put together my modified X-Carve. 


X-Carve Setup (4/1/2016)


Items used in this build: (purchasing through these affiliate links helps me to hack on)


  • CNC Z-Axis Tool Setting Touch Plate Probe Compatible With Mach3 and Other Router Mill
  • Raspberry Pi 2 Model B Project Board - 1GB RAM - 900 MHz Quad-Core CPU
  • JBtek 4 Channel DC 5V Relay Module for Arduino Raspberry Pi DSP AVR PIC ARM
  • DEWALT DWP611 1.25 HP Max Torque Variable Speed Compact Router with LED's
  • uxcell 5 Pcs 600V 15A 12 Positions 12P Dual Rows Covered Barrier Screw Terminal Block


  • For most of my journey, I followed the instructions laid out by Inventables. Here are the highlights of the parts that I went a little rogue with... 


    Work Bench

    • 48x48" Table
      • MDF Top
      • 2x4 construction
      • Pull out drawer for electronics and computer
    Pull out drawer for electronics and laptop

    Mechanical 

    • X Carve 1000mm (silver makerslides)
    • 3D printed spacers/supports in Y-Axis 
      • Added 5 of these printed in ABS, spaced evenly along 1m piece
    • Y-axis Guards
      • 1/8" ply covers held with (2) t-slot inserts and M5x8mm bolts
    1/8" plywood y-axis covers (view from front)
    1/8" plywood y-axis covers (view from back)
    • MDF waste board
      • 30" x 30" x 0.75" thick (workable area - surfaced using 1/2" bit)
        • threaded inserts every 6 inches
      • ~24"x ~6" x 3/4" MDF pieces under waste board for supports
    View of right side
    View of left side


    Electronics

    3D Printed Dust Shoe (v3 1.5" hose)
    TinyG v8 Board with Fan cooling
    • Rasperry Pi 2 running JSON server to wirelessly control x-carve
    • Relay controlled plug for vacuum and spindle control (on/off)
    • Terminal blocks connecting motors to controller
    Terminal blocks and relay controlled plug

    • CNC Z-Axis Tool Touch Plate Probe 
      • This thing is amazing. I highly recommend getting one! Just hook it up to the z-min end stop and you will have accurate z depths!


    My Build Notes

    • Want at least 12 foot cable for steppers
    • Eccentric spacers are much easier to work with than the eccentric nuts
    • Insert x-axis supports before installation
    • Terminal blocks make moving/changing electronics easy
    • Waste board size of cutting area makes sure entire thing is surfaced flat
    • Relay controlled vacuum and spindle is awesome!
      • Safety note: turn off power switch on spindle whenever changing bits!!

    If you have any questions or would like more details, please add a comment and I will update the post accordingly!