- More accurately set the home position of a work piece (i.e. Zeroing CNC with Camera)
- Monitor a carve (a different post)
- Create a time lapse video of a carve (review when things go wrong)
After some research on Chilipeppr, Raspi and the TinyG, I came across many of the articles listed in the reference section, which eventually led me down the rabbit hole of the mjpg-streamer. This article claimed that one could stream 30FPS video from a Raspi2 to a web browser with extremely low CPU usage (<15%); sounds like a winner!
Items used in this build: (purchasing through these affiliate links helps me to hack on)
- DBPOWER 2 MP 7M USB Waterproof Hd 6-led Borescope Endoscope Inspection Tube Camera(Silver Head)
- Raspberry Pi 2 Model B Project Board - 1GB RAM - 900 MHz Quad-Core CPU
- 3D Printed Endoscope holder (link coming soon)
How I Installed mpjg-streamer for Raspi2
I followed this tutorial put together by Rober Cudmore (thank you!!!) for the most part; had to hack it a little bit to make it work for me.Step 0: Get a Raspi2, Install Raspian and update and upgrade it.
I used a Raspberry Pi 2 for this build as it is what I use as my JSON sever for my CNC machine. THe 4 cores of the Raspi2 make it great for this build, so I do not have to worry about the camera(s) streaming affecting the commands sent from Chilipeppr (CNC control program).
Download and install an OS for the Raspi. I chose Raspian - Here is an installation guide.
sudo apt-get updatesudo apt-get upgrade
Expand the file system and enable the camera with:
sudo raspi-configStep 1: Install mjpg-streamer
install libjpeg8Check that USB camera is detected by the Raspi:
lsusbv4l2-ctl --all :
:
Pixel Format : 'MJPG'
:
:
Now let's download the mjpg-streamer...
wget http//sourceforge.net/code-snapshots/svn/m/mj/mjpg-streamer/code/mjpg-streamer-code-182.zipand upzip it...
unzip mjpg-streamer-code-182.zipand then build it...
# build with 'make'
    cd mjpg-streamer-182
    cd mjpg-streamer
    make mjpg_streamer input_file.so input_uvc.so output_http.so
Now, let's copy some configuration files to a new location...
# install by copying
    sudo cp mjpg_streamer /usr/local/bin
    sudo cp output_http.so input_file.so input_uvc.so /usr/local/lib/
    sudo cp -R www /usr/local/www
And change the LD_LIBRARY_PATH to where we copied the previous configuration files...
#export LD_LIBRARY_PATH=/usr/local/lib/If all went well, we should be able to run it with:
/usr/local/bin/mjpg_streamer -i "/usr/local/lib/input_uvc.so" -o "/usr/local/lib/output_http.so -w /usr/local/www"Well no errors were thrown, but there is no video displayed in the browser (see below for links to view)...
Raspi Output:
MJPG Streamer Version: svn rev:
Using V4L2 device.: /dev/video0
Desired Resolution: 640 x 480
Frames Per Second.: 5
Format............: MJPEG
Adding control for Pan (relative)
UVCIOC_CTRL_ADD - Error: Inappropriate ioctl for device
Adding control for Tilt (relative)
UVCIOC_CTRL_ADD - Error: Inappropriate ioctl for device
 :
 :
www-folder-path...: /usr/local/www/
HTTP TCP port.....: 8080
username:password.: disabled
commands..........: enabled
Let's go to the google machine...
Search Term: 'UVCIOC_CTRL_MAP - Error: Inappropriate ioctl for device'
After some reading and deciphering, I found this forum that gave some insight to the issue. With some trial and error, I got it running with the following command:
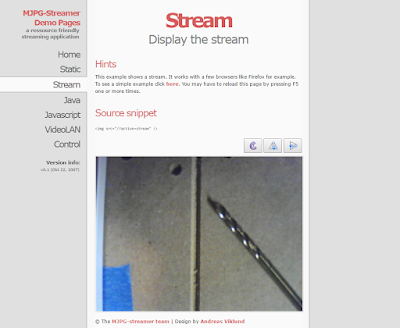
/usr/local/bin/mjpg_streamer -i "/usr/local/lib/input_uvc.so -d /dev/video0 -n -y f 15 -r 640x480" -o "/usr/local/lib/output_http.so -w /usr/local/www"Here is a snap shop of the stream (viewed at http://<raspi-ip>:8080 or http://<raspi-ip>:8080/?action=stream
Step 3.1: Reduce CPU Load (optional)
Using htop, I noticed it was running at 100% CPU for one core. I knew this could be reduced from reading this article, so I gave it a shot.Install vlc
sudo apt-get install vlcsudo nano videostream.shsudo chmod +x videostream.sh./videostream.shI got some errors (shown below), but it still works...
@JsonCNCpi ~ $ ./videostream.sh VIDIOC_ENUM_FMT: failed: Invalid argument unknown control 'compression_quality' Frame rate set to 30.000 fps VLC media player 2.0.3 Twoflower (revision 2.0.2-93-g77aa89e) [0x197dee0] inhibit interface error:Failed to connect to the D-Bus session daemon: Unable to autolaunch a dbus-daemon without a $DISPLAY for X11[0x197dee0] main interface error:no suitable interface module[0x1981230] main interface error:no suitable interface module[0x18118f0] main libvlc error:interface "globalhotkeys,none" initialization failed[0x1831850] dummy interface:using the dummy interface module...
Step 4: To view your mjpg stream:
Type this into your web browser to access the interfacehttp://<raspi-ip>:8080
Type this into your web browser to view the stream directly
http://<raspi-ip>:8080?action=stream
To view the stream using the low CPU stream:
http://<raspi-ip>:8554/webcam.mjpg
Step 4.1: To view your mjpg stream within Chilipeppr:
To view you webcam stream in Chilipeppr, head over to http://chilipeppr.com/xpixIn the Cam(v1) widget, click on the gear (settings), and enter in your MJPEG URL. Click close and you should be able to see your webcam view.
Note: By hovering over the screen shot, the image will zoom in 4x.
Note 2: You can set the X and Y offset along with the real distance width fields to use your camera as an accurate positioning device.
Step 5: Auto-Start Camera - Coming soon
Resources
- http://www.shapeoko.com/forum/viewtopic.php?f=3&t=4303&start=10
- https://plus.google.com/u/0/+FrankGraffagnino/posts/PFPmvMxTVTi
- https://www.youtube.com/watch?v=OK7MmGNr2hE&list=PLYPTUTcLMTK74VLPE4gAp8Kz8d09ipsBq&index=11
- https://github.com/xpix/XDisPlace/wiki/Install-camera
- http://blog.cudmore.io/post/2015/03/15/Installing-mjpg-streamer-on-a-raspberry-pi/
- http://blog.miguelgrinberg.com/post/how-to-build-and-run-mjpg-streamer-on-the-raspberry-pi
- https://github.com/jacksonliam/mjpg-streamer
- http://www.lewisroberts.com/2015/05/15/raspberry-pi-mjpeg-at-30fps/
- https://www.raspberrypi.org/forums/viewtopic.php?t=48597


Wonderful post. Keep sharing such a useful post.
ReplyDeleteNon woven fabric bag making machine