Throughout college, I always wanted to create a bottle cap table. Well, two years out of school, I finally got started... and finished...?
The plan is to put this bottle cap table top on top of a whiskey barrel coffee table... More on that later!

Step 1: Test Color Scheme
I bought a slab of oak wood from the local hardware store, cut it, and stained with two varieties. As I am bad with colors, I requested the assistance of my family and friends to vote on there favorite color.
 |
| Stain 1: Ebony |
 |
| Stain 2: Red |
Step 2: Purchase Plywood, Add Border, Stain and Protect
Well, the red made the bottle caps pop out much more than the dark ebony stain. Therefore, I went back to the hardware store and purchase a nice 48in x 24in sheet of 1/2" oak plywood. With the help of my neighbor, I added a nice 1" square oak boarder to the plywood, held in place with glue and some counter bore screws (border is ~1/2" above plywood surface to hold the epoxy). The counter bore holes were plugged with some nice walnut plugs. After a quick sanding with some 120 and 220 grit sandpaper, I stained the assembly, waited for the stain to dry, lightly sanded and stained again.

After drying overnight, I proceeded to protect the table top with 3 coats of polyurethane, which helps seal the wood and limit the number of bubbles that happen when the epoxy coating is added.
Step 3: Prepare
Start saving up your bottle caps! I have a few boxes from the help of family and friends!

I was planning on doing something like this; however, the size of my table would make it look just like a mess.

I ended up using power point to create my design; a block I for the University of Illinois, my Alma Mater.

Step 4: Hot Glue and Bottle Caps
I tested out several glues (gorilla glue, super glue) and found that hot glue was the best glue I had around. After bending the caps to be approximately round, I glues the outer rim and then set them down onto the table, holding pressure for ~10 seconds per cap. Warning: This is a tedious process! The following pictures were taken over a month apart... I put down ~20-50 caps per night a few nights a week.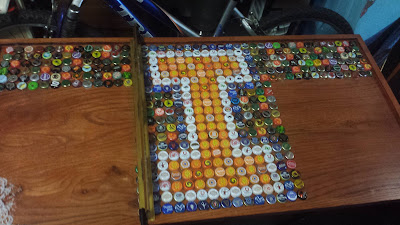 |
| Short rows |
 |
| Over half way there |
 |
| Complete!!! |
Step 4: Clean up Time
While the hot glue worked well, it was rather messy. I spent nearly an hour, pulling off extra glue strings and scraping any glue that ran outside of the caps. After about 10 minutes, I began using a shop vacuum to help suck up any bit of glue and string, eventually removing some of the caps! Once this happened, I got the hot glue gun out and began checking each cap to make sure it was secure to the table. Once the resin is poured, any un-secure cap would most likely float, causing the table to have a high spot... Not good for my OCD!Step 5: The moment of truth... The Resin Pour
Once sure the table was cleaned, I purchased some Environmental Technology 32-Ounce Kit Casting' Craft Casting Epoxy, Clear.Before pouring it on the table, I mixed up a very small batch and made a few coasters with the same stain, polyurethane and glue to make sure there was no odd chemical reaction with the various components. Everything worked well, So I mixed up a full batch of the 32 ounce kit, and then carefully poured and worked the resin around the caps.

 |
| Small bubbles forming before torching |
 |
| Die Bubbles, Die! |
So far so good, but I had to buy another 32 ounce kit...

and another 32 ounce kit...

In total, I used 4 kits to make a nice even glassy surface level with the wood borders. Between each pour, I let the resin cure for at least 24 hours. There is NO evidence of layer lines between the pours, and looks like glass!

This resin, while expensive, is well worth the price. It created a glass finish that should withstand the test of time. Now the next step is to find a whiskey barrel, break it apart, and make a home for this awesome table top!
This comment has been removed by the author.
ReplyDeleteThis comment has been removed by the author.
ReplyDeleteThis is very cool and creative creativity from the person who made this table from the glass bottles cap. Usually when we use the glass bottles we put the bottles cap into the dustbin because we think this bottles cap is useless but we are wrong on that way. We can use this bottles cap like this way as these caps are used here to make a unique table, Sri design will help you to make project like this.
ReplyDelete